Viza 618: Facial Modeling and Animation
Spring 2016
ASSIGNMENT 13: Final VERSION OF FINAL ANIMATION
For the most recent changes I've cleaned up the motion of the mouth again and also fixed visemes that were missing. I then reanimated the collar to be more stiff and less distracting from the face. I am very happy with the final results and believe this will be the last version of my animation.
Final Video Pass
ASSIGNMENT 12: Third VERSION OF FINAL ANIMATION
Here is the updated version of the animation. I've fixed the eye motion to be less loose, worked on some posing, and fixed the erratic motion of the mouth. I've also changed the background to be more vibrant by adjusted the blur so that the portal can be less eye catching.
Third Video Pass
ASSIGNMENT 11: Second VERSION OF FINAL ANIMATION
For the updated version of my final I've added textures to my character and finalized the background for the animation. The textures were created to give my character his reptilian look and alien nature. I've also updated the animation to be more exaggerated than the previous version. In addition to these changes I've added some ambient sounds to make it feel like he is in a space ship. I like how it's come along and will continue fine tuning it this week based on feedback from class.
Second Video Pass
ASSIGNMENT 10: First Version of Final Animation
Here is the first full version of the animation with sound. I think it's coming along really well and I'm happy with the result. I do want to fine tune some poses but for now I'll focus on creating the textures for the character. I'll also be looking into some background sounds to match the scene/setting.
First Video Pass

Background Examples
I have some examples of backgrounds that I can use for the animation. Each one is a little different and will determine the style I copy for the characters texture.


ASSIGNMENT 9: Third PHASE MODELING AND DIALOGUE
I've added some extra detail to my model as well as changed the color scheme. I'm planning to creating the actual textures for the reptile like skin and cloth/metal for the clothing this week. The rig is almost complete but needs some final adjustments. Below are images showing the current model and the rig controls. I also wanted to note a useful tool I found to mirror clusters (https://www.creativecrash.com/maya/script/sl_mirrocluster). It works by selecting the geometry and cluster then setting which axis you want the cluster to be mirrored over to. The one thing it does not due is update the adjusted pivot position of the cluster if changed from its original.
Model Images
Video Examples
Below is an example of facial poses expressing the personality and functionality of my alien rig. It's working really well so far but I need to adjust some of the eye lid clusters and I'm planning on creating viseme expressions using blendshapes.
ASSIGNMENT 8: Second PHASE MODELING AND DIALOGUE
I've been readjusting the model for my alien creature. Before it was too serious and heading toward realistic. I've been making it more cartoon-like so that I could make some more exaggerated expressions. The topology was also too heavy and needed to be cleaned up. The image below shows the color scheme that I am heading towards and a basic design along the model that will contain smoother transitions once I start creating the actual textures.
Model Images
Updated Dialogue:
- What is the last thing you remember?
- There was an accident with my teleporter. It's ok though; I think I can grow it all back. Yup... It's just a matter of time now... (Approximately 8 seconds)
ASSIGNMENT 7: First Phase Modeling and Dialogue
This is the first version of my final project. I am creating a reptilian/alien creature for my character and have been using a few references for style and design. I then created a drawing of what the character would look like from different angle. The drawing has been used as a basic outline for the 3D model.
Reference Images


Model Images


Dialogue:
- What is the last thing you remember?
- Well I was just drifting peacefully amongst the stars when the "check airlock light" came on. I had made it to the hatch when suddenly it blasts open! The next thing I knew I was like this! It's ok though my race can grow back body parts, well our tails at least... It's just a matter of time now... Yup...
- What did you do with the body?
- Oh that old thing? I didn't like the color of it so I'm currently waiting on my upgrade. Usually takes a few hours before they deliver the new one. I've been waiting a little longer than that but I'm sure it'll get here soon! Just a matter of time now...
ASSIGNMENT 6: Lighting Exercise
For this assignment we had to pose our character in three different facial expression then light them using 14 different light set ups. The expressions I chose were happy, angry, and sad and are based on the reference images below. We then chose which expression fit best in each light set up and rendered that scene. I used the control set up from the last assignment but adjusted the clusters around the mouth and cheek area as well as added a wrinkle blend shape for the forehead.
Reference Images


1. Light from high above camera, Camera directly in front. (Angry Expression) This lighting works really well with the angry face to give it a very intimidating look. The deep shadows around the eyebrows, mouth and cheek give it an intense feeling.
2. Light slightly above camera, Camera directly in front. (Happy Expression) This light works well for the happy face as it matches natural lighting. It's not too high so it fills in more shadows but still has enough shadows for it to look detailed.
3. Light directly in front, Camera directly in front. (Sad Expression) This lighting creates a more flat look by smoothing out the shadows. I felt that it looked the best on the sad expression compared to the other two.
4. Light from below, Camera directly in front. (Angry Expression) The light from this angle gives an unnatural feel and makes the angry face seem more menacing and eerie rather than upset.
5. Light 45 degree to the side and 45 degree above camera, Camera directly in front. (Sad Expression) I felt with the shadows casted the sad expression worked the best in this light set up. It emphasized the facial features that made up the expression.
6. Light directly to the side of the face, Camera directly in front. (Angry Expression) The fact that most of the face was hidden in darkness made me consider the angry expression. It made it seem more sinister as if revealing the character during a horror movie.
7. Short Lighting: Light located on the side and away from the camera, Camera is 3/4 view (Sad Expression) This light set up worked best with the sad face. The eyes seem to pop out more and you can make out the mouth position just enough to clarify the expression.
8. Butterfly Lighting: Light located in front of the face, Camera is 3/4 view (Happy Expression) This lighting is similar to the flat light set up shown before. The camera angle/light combination however worked best with the happy expression.
9. Broad Lighting: Light on the side of the face, Camera is 3/4 view (Angry Expression) Similar to before with the light at the side of the face the angry expression looks more intense.
10. Light is at the side and by the camera, Camera is at the side (Happy Expression) The happy expression shows the best at this camera angle and the lighting gives enough shadow at the front and back of the head for definition of features.
11. Light located in front of face, Camera is at the side (Sad Expression) Similar reason before for having the sad expression for this light set up. However at this camera angle the shadows on the sides create more detailed features.
12. Light located in front and at the side of the face away from the camera, Camera is at the side (Angry Expression) The angry expression worked best here because the light highlights the part of the face that show that expression (eyebrows, cheeks, chin, and mouth corners).
13. Light located behind the head and pointing at the background, Camera is at the side (Happy Expression) This lighting set up worked really well with the happy expression and even though you cannot see the eyebrows you can see how high they are and the silhouette of the smile.
14. Multi-Light Set up: Contains a main light (left side of face), fill light (front of face), hair light (back right and above head), and background light (pointing at background) (Happy Expression) This light set up worked the best for the happy expression and filled out the shadows to make it a more calm and relaxed photo.
ASSIGNMENT 5: "HAPPY" Cluster Based FACIAL ANIMATION
This is an updated version of assignment 4s animation of our character saying "happy." The difference in this project is that we had to create the animation using clusters rather then blend shapes.
The "Happy" Cluster Animation
Visemes (AA, PP, EE) with Cluster Controls


Below Are The Viseme Poses Created Using The Cluster Controls. They are ordered by AA, PP, and EE both in Gouraud Shading and Wireframe Shading.


ASSIGNMENT 4: "Happy" Blend Shape Facial Animation
In this assignment we had to study visemes to create a short animation of our character saying the word "happy." We needed to create each viseme using blend shapes and time it correctly to create the resulting animation.
The "Happy" Blend Shape Animation
Viseme Reference Images


Below are the blend shapes for the visemes needed to create the word "Happy." They are ordered by AA, PP, and EE both in Gouraud Shading and Wireframe Shading.


ASSIGNMENT 3: Facial Model INterpolation between different Expressions
We were tasked with creating additional faces for the model we created in assignment 2. Along with images of the new faces we had to create a 6 second animation showing all three faces (original and new ones) transitioning between each other. For my project I created a scared face and a toothy smile based on these reference images.
The Resulting Animation Of The Transition Between Each Blend Face
Below are the faces I created based on the reference images. They are ordered by Scared with Gouraud shading, Scared with Wireframe shading, Smile with Gouraud shading, and Smile with Wireframe shading

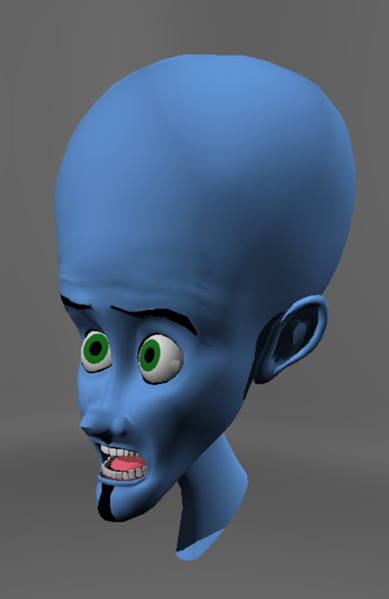


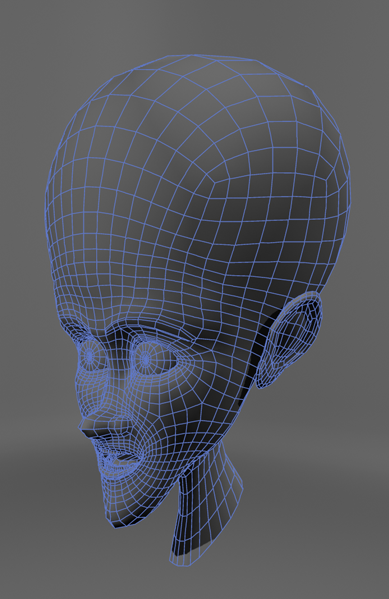
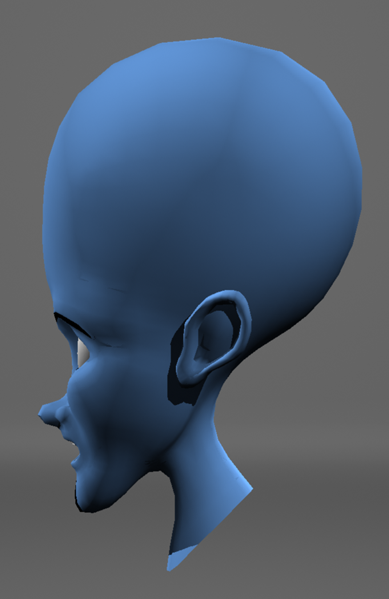
ASSIGNMENT 2: Static Polygonal Facial Model With A Specific Expression
We needed to build a model of a character by using sculpting techniques. I started from a basic cube and built up the geometry based off of the reference material. I chose to make MegaMind based on his extreme facial expressions and slight asymmetric features. Below is the main reference for the facial expression followed by the screen shots of the model.


References For The Side Of The Head And Topology Reference For The Face


Polygon Count:
- Total: 3930
- Head and Neck: 2606
- Eyes: 256 per eye
- Ears: 298 per ear
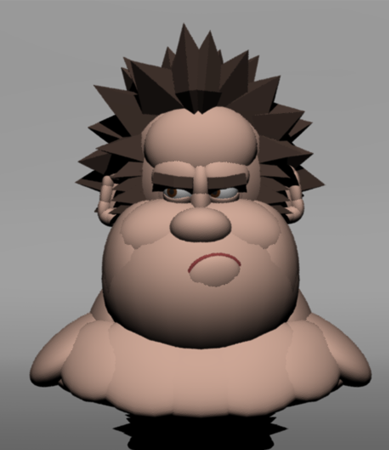
ASSIGNMENT 1: Facial Modeling With Simple Geometry
For this assignment we needed to build a model of any character we chose by using geometric shapes (spheres, cubes, toruses, etc). I chose to make Ralph from Disney's "Wreck-it Ralph." I created three facial expressions (Happy, Mad, and Scared) based on reference pictures shown below. I mainly used spheres for each facial model but I also used toruses for the lips and eyelids as well as cubes for the eyebrows and teeth.


Parameters Required:
- Head/Neck: Rotation and Translation
- Ears: Slight rotation (front, back, up and down)
- Eyes: Eyelid rotation and Eye gaze.
- Eyebrows: Translation (up and down), Rotation, and three part Squash and Stretch (outside, middle, and inside).
- Nose: Rotation (up and down) and Squash and Stretch.
- Jaw: Rotation (up and down), Translation (left and right).
- Mouth: Lip scaling, rotation, and translation along the face. Upper lip needs translation along sections for lip curl.
- Hair: Will need to be simulated.
Assignment 0: Exaggerated Facial Posture Expressions
I created several photos of myself making facial expressions. I focused on extreme positions and also had some fun with the faces I was making. The goal of the assignment was to keep track of the faces we made and to think about what our faces were doing when we made each expression.


